Manage your mail with Machine Learning and Paperless-NG

Introduction
In this, my first blog, I would like to confess something to you: I’m terrible with mail. Paper mail is my arch enemy and I leave it in piles everywhere: it drives my wife somewhat crazy. And when she eventually cleans it up for me, I’m never sure if I was supposed to keep some important letters.
So I decided to scan everything. And this worked for a while, but I could never find the right letter easily in just a folder on my home server. As the pile of PDF files grew I needed a way to search what was inside these files.
I went searching for an application that I could host on my server and found several projects like papermerge and paperless. I ended up using both for a little while but they require some administration to correctly categorize all mail.
They include some automation but for most mail it’s not a complete solution. For example: I receive letters from out city hall regularly. I could set an automation to set the correspondent of a letter to “city hall” based on a few words that were found in the letter. But if I received another letter that mentioned my city name, the software would become confused. So this solution only worked if my letters had some unique combination of words in them.
Then I found Paperless NG. A fork of the original Paperless project, but it included some nice extra features and a Machine Learning algorithm that learned patterns over time to automagically guess some important data. I really want to thank @jonaswinkler for his great work!
Getting started
Obviously, Paperless NG needs to run on some hardware so here is the list of things you need:
- Computer with a 64-bit x86 CPU (like a NAS with an Intel processor) or a ARMv7 processor like a Raspberry Pi 2B or newer
- OS that can run docker containers
- Docker-compose
- Enough free RAM (500MB – 1GB should be enough)
I personally run this on a self-built UnRaid machine that has native support for docker.
If you need help installing docker and docker-compose on your machine, please start here: https://docs.docker.com/engine/install/ and here: https://docs.docker.com/compose/install/
Installing
To install the docker containers for Paperless NG, head over to the github page and download the latest dockerfiles release. Extract the archive and you’ll find 3 files:
- docker-compose.env
- docker-compose.postgres.yml
- docker-compose.sqlite.yml
First, we need to choose which edition we want. The postgres edition is for larger environments, so I chose the SQLite edition that saves all info in a local database file, without needing to use a separate database server. To continue, rename the yml file of your choice to docker-compose.yml.
Now, the editing starts. Here you need to read and change what suits your server and your needs. Default the sqlite docker-compose file loos like this:
1 2 3 4 5 6 7 8 9 10 11 12 13 14 15 16 17 18 19 20 21 22 23 24 25 26 27 28 29 30 31 |
version: "3.4" services: broker: image: redis:6.0 restart: always webserver: image: jonaswinkler/paperless-ng:0.9.6 restart: always depends_on: - broker ports: - 8000:8000 healthcheck: test: ["CMD", "curl", "-f", "http://localhost:8000"] interval: 30s timeout: 10s retries: 5 volumes: - data:/usr/src/paperless/data - media:/usr/src/paperless/media - ./export:/usr/src/paperless/export - ./consume:/usr/src/paperless/consume env_file: docker-compose.env environment: PAPERLESS_REDIS: redis://broker:6379 volumes: data: media: |
This docker compose file works just fine out of the box, but I chose to use file system folders instead of docker volumes. But this is my own preference. Please note here the location of the /consume directory: this is the place where you can put scanned PDF or image files to import them into Paperless NG. I change the /consume directory to a SMB share, so I can directly upload scanned files from my phone to this location.
Next, we need to edit the docker-compose.env file to suit our needs. It looks like this out of the box:
1 2 3 4 5 6 7 8 9 10 11 12 13 14 15 16 17 18 19 20 21 22 23 24 25 26 27 28 29 30 31 32 33 34 |
# The UID and GID of the user used to run paperless in the container. Set this # to your UID and GID on the host so that you have write access to the # consumption directory. #USERMAP_UID=1000 #USERMAP_GID=1000 # Additional languages to install for text recognition, separated by a # whitespace. Note that this is # different from PAPERLESS_OCR_LANGUAGE (default=eng), which defines the # default language used when guessing the language from the OCR output. # The container installs English, German, Italian, Spanish and French by # default. # See https://packages.debian.org/search?keywords=tesseract-ocr-&searchon=names&suite=buster # for available languages. #PAPERLESS_OCR_LANGUAGES=tur ces ############################################################################### # Paperless-specific settings # ############################################################################### # All settings defined in the paperless.conf.example can be used here. The # Docker setup does not use the configuration file. # A few commonly adjusted settings are provided below. # Adjust this key if you plan to make paperless available publicly. It should # be a very long sequence of random characters. You don't need to remember it. #PAPERLESS_SECRET_KEY=change-me # Use this variable to set a timezone for the Paperless Docker containers. If not specified, defaults to UTC. #PAPERLESS_TIME_ZONE=America/Los_Angeles # The default language to use for OCR. Set this to the language most of your # documents are written in. #PAPERLESS_OCR_LANGUAGE=eng |
To start, I recommend changing the following lines:
USERMAP_UIDUSERMAP_GID- Remove the # to uncomment and change these to the user and group numbers that have permission to read/write in the folders you specified in the docker-compose.yml.
PAPERLESS_OCR_LANGUAGES- Remove the # to uncomment and change this to the languages you receive mail in.
PAPERLESS_SECRET_KEY- Remove the # to uncomment and change this to a random string, so make your web sessions more secure
PAPERLESS_TIME_ZONE- Remove the # to uncomment and change to your local timezone to make sure all documents are in the right time.
At this point, there might be more things you’d want to change. So for more information, I’d like to refer you to the excellent documentation: https://paperless-ng.readthedocs.io/en/latest/setup.html#docker-route
When your files are finished, you can start Paperless NG on the command line in the folder with your files, by running: docker-compose up -d
Working with Paperless NG
When Paperless NG starts, it has no superuser yet, you’ll need to create it manually on the command line. You’ll need to open a shell inside the paperless webserver docker container and run the following command: python ./manage.py createsuperuser. This will create your first admin user so you can log in.
Now you can browse to http://<ipaddress>:8000 to access Paperless NG. Now log in with your newly created superuser and you’ll be greeted by the dashboard:

Before you start scanning and importing documents, try to do a few steps first to make your life easier:
Create Correspondents, Tags and Document Types
This is where the Machine Learning comes in. The AI in Paperless NG can evaluate all documents that have been consumed and find common words and phrases for each specific Correspondent, Tag and Documents type. So to “teach” it, we first need to tell it what to learn.
Correspondents are all the sources and companies you receive mail from. Try to add as many as you already know to start. Make sure you specify them as “Auto” for the matching algorithm, this sets it to use the AI instead of regular word-matching. Of course, when you receive mail form companies with a very specific word, you can choose to forgo the AI and just use regular word-matching if you wish to do so.

Tags can be used for any number of uses. I advise to create the Inbox tag for all newly consumed documents that you want/need to check. I also created tags for me and my wife, so we can later search for our personal mail.
Document types are faily explanatory, I created a few like:
- Invoices
- Letters
- Contracts
- Insurance Policies
- etc.
For more in-depth documentation on this, follow this guide: https://paperless-ng.readthedocs.io/en/latest/usage_overview.html#preparations-in-paperless
Consuming your documents
At first, your AI is very new and doesn’t know very much. So you need to train it by consuming a first batch. I recommend about 20 at first, do more as you go. Scan your documents using your favorite scanner, I use a smartphone and the Onedrive app to create PDF files. Then upload them using the web interface or place them in the consume directory. There is also a handy Android app on https://github.com/qcasey/paperless_share. I’m not recommending installing anything outside of the Play Store, but this allows you to share scans directly to Paperless NG from your scanning app.
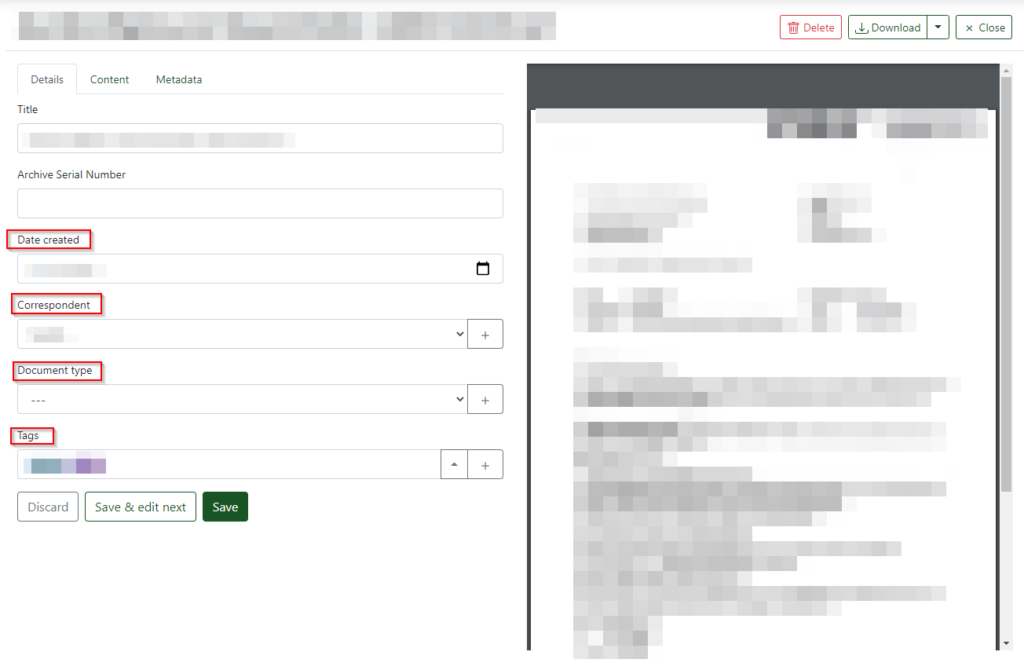
After a few minutes, depending on the speed of your machine, you will see your documents appear in the web interface. If you created the Inbox tag you’ll see that each of them have been tagged. Next you’ll need to fill out the the Correspondent, Tag and Document type for each consumed document to teach the AI.

After this part, you need to wait at least an hour. The system only “trains” the AI once every hour, so you need to wait for this process to finish. After that you can upload another batch and correct it. Keep going until the AI recognizes all your documents correctly and you can upload documents without having to correct them at all.
Closing
This software is still in beta and can have issues. But in my uses I haven’t seen any problems that couldn’t be solved. For further information like making backups and updating the software, please go to: https://paperless-ng.readthedocs.io/en/latest/administration.html#
Again many thanks to @jonaswinkler and happy scanning!

Great read Rutger!!
Thanks / bedankt Rutger, time well spend in a lockdown X-mas
Very good write-up! Thanks to you, I finally managed to get paperless working in Docker!
One thing, you might want to update – in order to get ./manage.py createsuperuser to work, I had to chmod+x ./manage.py first. You might want to call that out.
Thanks for the correction Lanre, I made the change to the article