How to securely self-host a website or web app

Introduction
So, you have a Raspberry Pi, NAS, Server, or a firewall and you’d like to host a website… Let me first tell you: it’s not always wise to do so.
The internet is full of scary people and devices that will try to knock on your “Front door” to see if they can take advantage of your beloved systems.
The more “friendly” ones might use them to execute DDOS attacks on others, or use your hardware to mine bitcoins for their own profit.
In the worse cases, they might encrypt your files and ask for money for you to be able to access them again. And some of them even don’t even return your files after you’ve paid. Other ones will simply destroy your systems just for the fun of it.
No system connected to the internet is ever 100% secure and this guide will only give guidelines to be more secure, there’s no guarantee that this will keep out everyone and everything that don’t belong on your network.
Why did I do it this way?
With all the mandatory scary talk out of the way, let’s dig in. Despite the risks, self-hosting makes sense for me in a couple of ways:
- It saves me some costs, my server is running 24/7 anyway
- It gives me absolute control of what I’m hosting and I know where the data is stored
- The only limit is my hardware
- I get to work with projects from the great open-source community
When I thought of this solution, these were the requirements before I set out:
- No costs, other than the yearly fee for a domain name and running the server
- It has to run on my existing infrastructure
- The web hosting has to keep out script kiddies and bots that try standard hacks
- It has to be as hands-free as possible, so I don’t have to keep looking at it in my free time
Now, how do you do it?
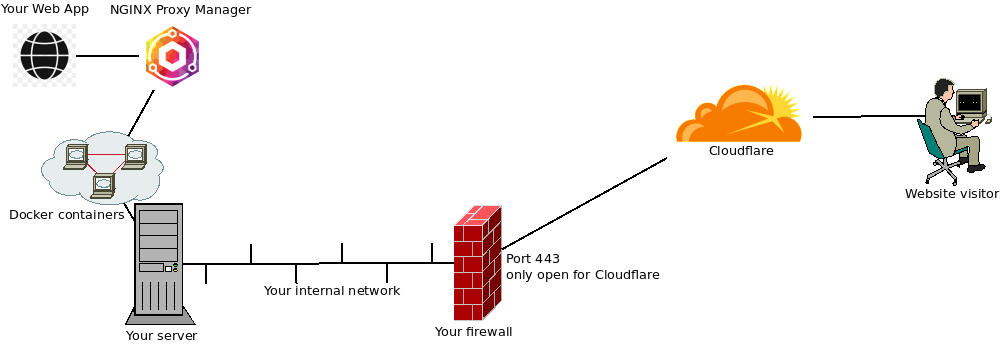
For the tech-savvy people: look at the following picture and you can be on your way 🙂 .

For the less tech-savvy people: let me explain each step of the drawing and you can try to figure out how to do it with your own hardware. This document is meant to be independent of hardware/software as much as possible, so I’ll only give examples. If you have a better way of achieving the same thing, more power to you. Maybe leave a comment below if you have a good idea to share with the community.
Server – Containers!
Let’ start with the device actually hosting the website. At the very least you should think about regular updates and backups, but you knew that already… right? But if you just install the web server application in your OS, you still have a risk. Usually the web server process on your system runs as a special user account and it has permissions to read lots of places on your drives.
So I suggest to run all services that are exposed to the internet to be run inside a container. A container is a little like a virtual machine, but with much less overhead and you don’t have to install an OS in the container. I personally use docker containers on my systems, but there are others like kubernetes. This way, the web server inside the container can only access the folders you specifically assign to it and you could even limit the CPU and memory resources of each container.
Some devices have docker support out of the box, some need extra installation. I’m not going into detail on how to get it running but here is a good place to start: https://docs.docker.com/get-docker/.
Enter the Reverse Proxy – NGINX Proxy Manager
Reverse Proxies are great tools to publish a website to the internet. They can make multiple websites run on a single IP address, do security inspections and make sure your website is accessed in a secure way by using HTTPS (TLS). Therefore, you just need one.
The Reverse Proxy I recommend is NGINX Proxy Manager (https://nginxproxymanager.com/guide/). It does all of the above and is also a very light WAF. A Web Application Firewall (WAF) inspects all requests to your website and looks if someone is trying to get information from it that someone shouldn’t see like username lists or passwords.
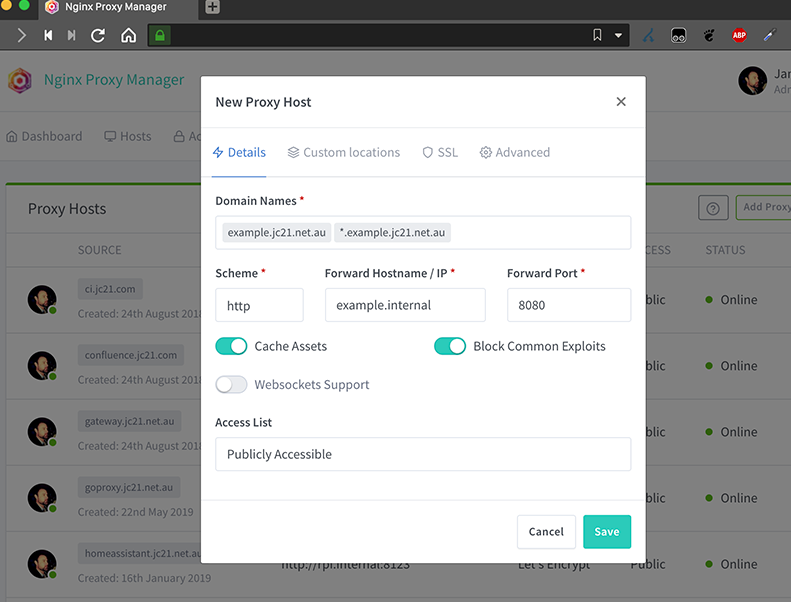
NGINX Proxy manager has a nice web interface to configure all your needs, you can tell the public domain name of the site and where your site is located in your internal network. Make sure you check the “Block Common Exploits” checkmark to get all the WAF goodness. It also features Letsencrypt support so you could stop here if you want, but there’s more to come.

Set up Cloudflare
Cloudflare is a great service. They have a free plan and it’s more than enough for personal hosting and small blogs. What they do is a little like the Reverse Proxy, but then on the Internet. I’ll explain with an example: Say you’re hosting blog.test.org. They will ask you to move the DNS zone of your domain test.org to cloudflare and they will handle all your DNS needs from then. Then they will point your DNS record for blog.test.org to their servers first. Their servers keep a small cache of images and other things on your site to speed up the load times and they scan for malicious activity.
When the request for the website is not malicious, they will get the contents from your NGINX Proxy Manager. If you do it this way, you have two lines of defense before a web request is sent to your actual web server container.
Cloudflare likes to communicate with your NGINX Proxy Manager with TLS certificates. You can download the certificate for your custom domain name from the Cloudflare portal and install it into your NGINX Proxy manager.
Port Forwarding – Only for Cloudflare
The last step here is to open up a port in your firewall and point it to your NGINX Proxy Manager’s HTTPS port (HTTP is not needed here). There is one issue here: when a regular users opens up port 443 for HTTPS, most malicious scanners will notice within the hour and will start scanning your website for vulnerabilities. Therefore it’s highly recommended to only allow the port forward to the IP addresses of Cloudflare.
They host their IP addresses on this site: https://www.cloudflare.com/ips/. Using your firewall, you can import those lists in a Firewall alias of IPSet, depending on the make and model of your firewall. I highly recommend using PFSense, OPNSense, OpenWRT, DD-WRT or Freshtomato.
When your port forward is only opened to Cloudflare, no scanner will find your open port and no one will prove your IP address for potential vulnerabilities.

I think using Cloudflare gives away the independence and control of self-hosting : many many people are depending on this single point, managed by the same company.
Thanks for the beginner-friendly explanations, though.
I think any self-hosted web service has a point of dependence. If it’s your ISP, the creators of the open-source software of a 2rd party like cloudflare. There are other services out there that do the same, the point is to make it secure, not remove a dependency.
Hi Rutger,
Thanks for the great article! May. I ask – how do you get a free Cloudflare account? (As with most companies with a free version available, its difficult to find!)
Thanks!
Got to https://dash.cloudflare.com/sign-up and follow the steps. You’ll start with a free plan and can upgrade whenever you wish to.
Great article.
Thank you very much